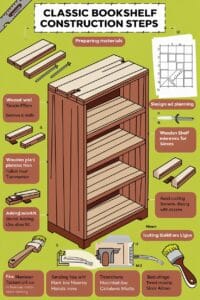
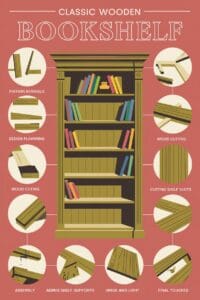
Crafting Your Own Classic Bookshelf: A Simple Guide to Timeless Elegance
Ever found yourself standing in the middle of a room, looking at a blank wall, wondering what could bring life to that empty space? Imagine a classic bookshelf that not only organizes your treasured books but also adds a touch of timeless elegance to your home. Picture this: a perfectly sized, handcrafted wooden bookcase standing proudly in your living room, showcasing your favorite reads, decorative items, and perhaps a plant or two. Sounds inviting, right? If the thought of building your own furniture has ever crossed your mind but seemed too intimidating to pursue, let’s take a journey together. In this guide, we’ll walk you through building a classic bookshelf that’s both functional and stylish, step by step.
Why Build Your Own Bookshelf?
Before we dive into the process, let’s discuss why you should even consider building your own bookshelf in the first place. Firstly, it’s incredibly satisfying to create something with your own hands. Each time you see the bookshelf, you’ll be reminded of the effort you put into it, and it will make the piece that much more special. Moreover, by building it yourself, you can customize the dimensions and the design to fit your space perfectly. You’ll save money compared to buying a high-quality bookshelf from a store, and let’s face it, nothing quite matches the charm of a handmade piece of furniture.
Materials and Tools You’ll Need
Now that you’re intrigued, let’s go over what you’ll need. Here’s a simple list of materials and tools required:
Materials:
- Plywood sheets: Choose good-quality plywood for durability.
- Wood glue: Essential for keeping pieces together securely.
- Wood screws: For extra stability.
- Trim pieces: To give your bookshelf a classic look.
- Sandpaper: To smooth out rough edges.
- Paint or wood stain: Depending on the finish you prefer.
Tools:
- Circular saw or table saw: For cutting the plywood.
- Measuring tape: Precision is key.
- Drill and drill bits: For making holes for screws.
- Clamps: To hold pieces together while the glue dries.
- Paintbrushes: If you’re painting or staining the bookshelf.
Step 1: Planning and Measurements
Start by planning out the size of your bookshelf. Consider the space where you want to place it and how many shelves you’d like it to have. A standard bookshelf might be around 6 feet tall and 3 feet wide, but you can adjust these dimensions based on your needs. Sketch out a basic plan, noting down the measurements of each part. This will be your roadmap throughout the build.
Step 2: Cutting the Wood
Using your circular or table saw, carefully cut the plywood into the required pieces based on your measurements. Typically, you will need two sides, a top, a bottom, and multiple shelves. Make sure to cut the shelves according to the height and spacing you prefer. Sand the edges of each piece to avoid any splinters and to prepare them for a smooth finish.
![]()
Step 3: Assembling the Frame
Now, it’s time to assemble the frame. Lay the two side pieces down, parallel to each other. Attach the top and bottom pieces to the sides using wood glue and screws. Apply wood glue to the edges where the pieces meet, then secure them with screws for added stability. Use clamps to hold the pieces in place while the glue dries. This ensures that the frame is solid and won’t wobble.
Step 4: Adding the Shelves
Decide the spacing for your shelves. If you want equal spacing, mark the same distance along both sides. Apply wood glue to the edges of the shelves and slide them into place. Once positioned correctly, secure them with screws from the outside of the frame. This step will require some patience and precision, as you want all your shelves to be level and sturdy.
Step 5: Installing the Back Panel
Cut a piece of plywood to fit the back of your bookshelf. Attach it using wood glue and small screws or nails. The back panel provides additional support and keeps the bookshelf from swaying. It also gives your bookshelf a finished look from behind.
Step 6: Adding Trim
To give your bookshelf a classic and polished look, add trim pieces around the edges. Measure and cut the trim to fit around the top and bottom of the bookshelf. Use wood glue and small finishing nails to attach the trim. This step adds a touch of elegance to your bookshelf and hides any rough edges or seams.
Step 7: Sanding
![]()
Once everything is assembled, go over the entire bookshelf with sandpaper. Focus on smoothing out any rough spots, edges, or areas where glue may have seeped out. This not only improves the look of your bookshelf but also prepares the wood for painting or staining.
Step 8: Painting or Staining
Choose a paint or stain that complements the style of your room. If you prefer a natural look, a wood stain will enhance the grain of the wood, giving it a warm, classic appearance. On the other hand, a coat of paint can give your bookshelf a modern feel. Use a paintbrush to apply the finish evenly, and allow sufficient time for it to dry. You might want to apply a second coat for durability.
Step 9: Final Touches
After the paint or stain has dried, go over the bookshelf once more with fine-grit sandpaper to smooth out any imperfections. Wipe away any dust with a damp cloth, and your bookshelf is ready to be placed in your room. Arrange your favorite books, decorative items, or plants, and step back to admire your handiwork. Not only have you saved money and added a personal touch to your home, but you’ve also created a piece of furniture that can be passed down for generations.
Common Questions About Building a Bookshelf
1. How thick should the wood be for a bookshelf?
For a sturdy bookshelf, plywood around 3/4 inch thick is ideal. It provides enough strength to hold books without bending or sagging.
2. What type of wood is best for building a bookshelf?
Plywood or solid hardwoods like oak, maple, or pine are excellent choices. They offer durability and a nice finish, whether stained or painted.
3. How do I prevent my bookshelf from tipping over?
To ensure stability, attach the bookshelf to the wall using L-brackets or anchors. This is especially important for taller bookshelves.
4. Can I customize the size of the bookshelf?
Absolutely! One of the biggest advantages of building your own bookshelf is the ability to customize its size to fit your space perfectly.
5. How do I get a smooth finish on my bookshelf?
Sanding is key. Make sure to sand all surfaces before painting or staining. After applying the first coat of paint or stain, sand lightly again for an even smoother finish.
![]()
6. Is it necessary to add a back panel?
While not strictly necessary, a back panel adds stability and a finished look. It helps keep the bookshelf square and prevents items from falling off the back.
7. Can I build a bookshelf without power tools?
Yes, it’s possible, though it will take more time and effort. Hand saws, a hammer, and nails can be used, but power tools make the job easier and more precise.
![]()
8. How can I make my bookshelf more stylish?
Adding decorative trim, molding, or unique paint colors can enhance the aesthetic appeal of your bookshelf. You can also add wallpaper to the back panel for a pop of color.
9. How long does it take to build a bookshelf?
The time required depends on your experience level and the complexity of the design. For a basic bookshelf, it might take a weekend, including drying time for paint or stain.
![]()
10. Do I need to seal the bookshelf?
If you’ve painted the bookshelf, a sealant isn’t necessary. However, if you’ve used a stain, applying a clear polyurethane sealer will protect the wood and enhance its longevity.
Building your own bookshelf is a rewarding project that adds both functionality and beauty to your home. Whether you’re an experienced woodworker or a beginner, following these simple steps will help you create a piece of furniture you can be proud of. So grab your tools, roll up your sleeves, and start building your dream bookshelf today!